
Work lights • Beam patterns • Mounting • Wiring • Use cases
Tractor Work Lights Explained: Beam Patterns, Mounting, and Use Cases
Tractor work lights are among the most practical upgrades a farmer or agricultural contractor can make.
They extend working hours into the night, improve safety around machinery, and increase accuracy during operations such as ploughing, baling, and spraying.
In many cases, they are the difference between finishing the job safely or working blind in the dark.
This comprehensive guide explores what tractor work lights are, how they function, how to choose the correct beam patterns, and the best practices for mounting and maintaining them effectively.
Imagine harvesting silage at midnight in October.
The drizzle reflects every glare, the ground is uneven, and the rear baler needs constant attention.
Good lighting turns a stressful, risky task into a controlled and efficient operation.
Farmers across the UK increasingly see lighting not as a luxury but as essential safety equipment.
Jump to
What are tractor work lights and why they matter
Work lights are auxiliary lamps designed to illuminate working zones around the tractor or its implements.
Unlike headlights, which are regulated for on-road use, work lights focus on task lighting for off-road, field, or yard operations.
They are crucial for reducing operator fatigue, improving night-time visibility, and preventing accidents.
Historically, halogen lights were the standard, offering around 700–1,000 lumens but drawing heavy current and generating excess heat.
The introduction of HID (High-Intensity Discharge) systems improved light intensity but required warm-up time and costly components.
Modern LED systems now dominate the market they produce up to 10,000 lumens, are vibration-resistant, and consume far less power.
Brands such as Hella, Britax, and Durite have made LED upgrades widely accessible, while OEMs like John Deere and Massey Ferguson fit them as standard.
Beyond brightness, work lights contribute directly to operator wellbeing.
Studies show that consistent lighting reduces visual strain and errors during long working hours.
In large arable farms or contract baling operations, clear illumination can cut downtime by up to 20% during the harvest season.
Understanding beam patterns and light output
Beam pattern determines how light spreads across the field or yard.
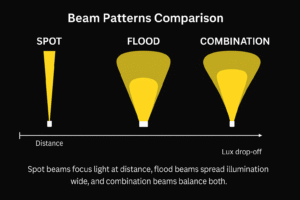
The three main types are spot, flood, and combination beams.
Spot beams – produce a narrow, long-distance beam (10–30°). Ideal for identifying field edges or navigating access tracks.
• Flood beams – offer wide, short-range illumination (60–120°). Perfect for tasks like loading, spraying, and baling.
• Combination beams – merge both beam types for balanced coverage in mixed-use applications.
To visualise beam spread: a 60° flood light mounted 2.2 metres high typically illuminates a 10-metre width at 10 metres distance, while a 20° spot reaches over 40 metres but with narrower coverage.
Choosing the correct beam ensures full visibility without glare or wasted light.
Brightness is measured in lumens, but that doesn’t tell the full story.
Lux the light intensity at a specific point gives a truer picture of how well a beam performs.
A 4,000-lumen flood delivering 30 lux at 10 metres will outperform a 5,000-lumen unit producing only 15 lux due to poor optical focus.
Colour temperature also matters.
Cool white LEDs (5,000–6,000K) replicate daylight, helping detect obstructions or furrows, while warmer tones (3,000–4,000K) are softer on the eyes and better suited to livestock areas.
Mounting tractor work lights correctly
Positioning is just as important as brightness.
Correct mounting ensures light is distributed evenly across the work area while preventing glare.
On tractors like the John Deere 6155R or Case IH Puma, roof-mounted lights offer 270° visibility when angled correctly.
Conversely, mudguard mounts provide close-proximity illumination for hitching and loading.
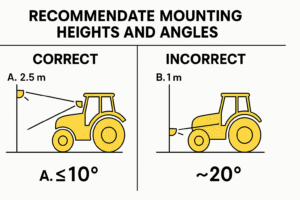
For optimal coverage, front work lights should be positioned around 2–2.5 metres above ground, angled 10–15° downward.
Rear floods should be fitted slightly lower (1.8–2.2 metres), directed toward the working implement.
Side lights can fill blind spots along trailers or implements.
Vibration can distort beam direction over time.
To combat this, use rubber washers or damped mounting brackets.
Stainless steel fittings resist corrosion better than standard bolts.
Electrical setup and power considerations
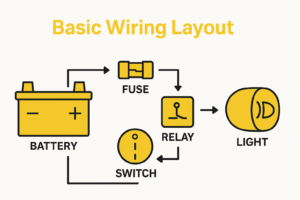
Electrical setup determines whether your lighting system is reliable or short-lived.
Incorrect wire gauge or grounding is responsible for most failures.
Tractors generally use 12V systems, though heavy-duty machines such as Fendt or Claas can operate at 24V.
Always check the system label before connecting new lights.
Voltage drop is a common issue.
As current flows through wiring, resistance causes power loss.
For example, a 2.5mm² cable running 5 metres carrying 10A will lose roughly 0.3 volts, small but significant over long runs.
Oversized wiring and proper relays ensure consistent brightness.
To calculate circuit load, divide total wattage by voltage.
Six 48W lights on a 12V system draw 24A, meaning you’ll need a 30A relay and 35A-rated wiring.
Each circuit should be protected with an inline fuse 20% higher than total draw (e.g., 30A load = 36A fuse).
Alternator capacity must also be considered.
A typical 90A alternator running tractor electronics, lighting, and cab accessories might only have 40A spare.
Overloading it shortens its lifespan and causes dimming at idle.
Work light use cases across farming operations
The correct lighting setup depends on the type of work and environment.
Agricultural contractors, livestock farmers, and arable operators all face different visibility challenges.
During night-time ploughing, twin rear floods illuminate furrows clearly, allowing operators to monitor depth and alignment.
For spraying, a combination of side and rear floods reveals nozzle patterns, reducing overlap or missed strips.
In silage work, loaders benefit from high-mounted floods that highlight the clamp face and loader bucket edge.
Winter feeding in muddy yards requires wide 120° floods positioned high to avoid glare off puddles.
Portable magnetic LED lights are useful for breakdowns or short-term lighting on towed implements.
[Expert Insight] Contractors often install adjustable floodlights on telescopic handlers, giving flexible coverage for stacking bales or loading grain trailers at night.
[Safety Tip] When operating near public roads, switch off non-road lighting to avoid dazzling traffic.
Only road-legal lamps may remain active.
See our UK Tractor Lighting Laws Explained guide for details.
Maintenance and troubleshooting
Keeping lights reliable requires routine inspection.
Dust, vibration, and moisture can all degrade performance over time.
Inspect monthly for loose brackets, cracked lenses, and frayed cables.
Clean with a damp cloth, never pressure wash directly onto seals.
Reapply dielectric grease to connectors every six months to prevent corrosion.
A structured maintenance schedule helps:
• Monthly: visual inspection of mounts and brightness.
• Pre-harvest: check voltage at lamp terminals and retighten grounds.
• Post-winter: clean lenses and re-seal rubber gaskets.
[Common Mistake] Replacing a blown fuse without checking for trapped or pinched wires can result in repeat failures.
Most LED units are sealed to IP67 or IP68 standards, meaning they can withstand rain and short-term immersion.
If moisture appears inside the lens, it indicates a compromised seal, replace the unit immediately.
Choosing the right LED work light for your setup
Selecting the right light involves balancing brightness, beam angle, durability, and price.
Cheap imports may advertise high lumen ratings but lack proper beam focus or waterproofing.
Premium brands use genuine Cree or Osram LEDs with precise optics, ensuring higher lux and longer lifespan.
Look for these specifications when buying:
• Lumens: 3,000–10,000 depending on task.
• IP rating: IP67 or higher for water resistance.
• Housing: die-cast aluminium for heat dissipation.
• Lens: polycarbonate to resist cracking.
• Warranty: at least two years for reliability.
Balance is key, a £40 light that fails mid-harvest costs more in downtime than a £120 professional unit.
See our comparison article Are Cheap Tractor Lights Worth It? for a full breakdown.
Summary and key takeaways
Tractor work lights transform productivity and safety during low-light operations.
By understanding beam types, correct mounting, and safe electrical installation, operators can achieve clear, glare-free visibility across all conditions.
Regular maintenance and proper selection of LED units ensure long-term performance and compliance with UK road laws.
For more detailed guides, see:
• The Complete Guide to Tractor Lighting
• 12V vs 24V Tractor Lights
• Troubleshooting Tractor Lighting Issues
• Are Cheap Tractor Lights Worth It?
• UK Tractor Lighting Laws Explained